top of page

DISINTEGRATION COMPOSITION
CONCEPT
The disintegration of a character.
INSPIRATION FROM THE INDUSTRY
I have got inspiration from the Dr. Manhattan film 2009 when the character of Dr. Jonathan Osterman was disintegrated by accident. In the film, the VFX department used a special human mesh with led lights to create many light points which we can appreciate in the below scene. I focused on the VFX disintegration using energy and smoke leaks, creating a new style but still a pretty similar disintegration.


CREATIVE PLAN / STORYBOARD

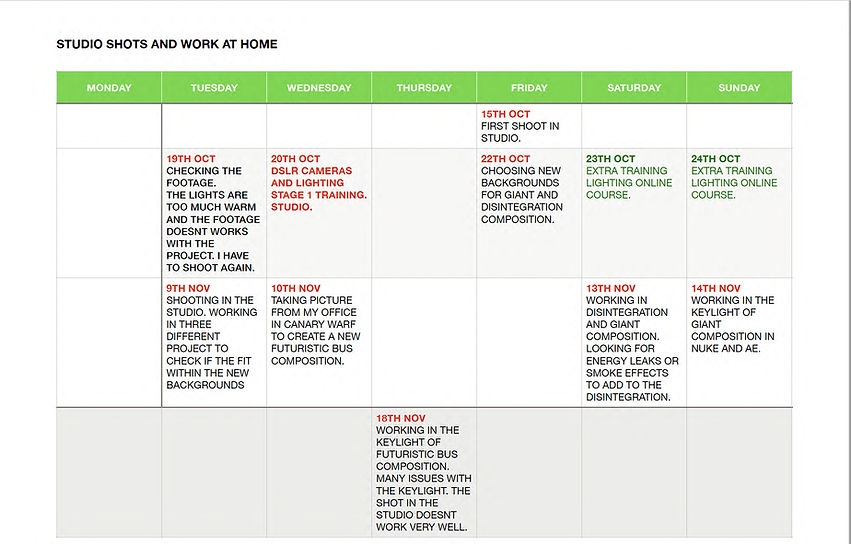
PRODUCTION SCHEDULE
I had the idea to work on a couple more compositions to experiment with different concepts. I tried to work on the Key- lights, and backgrounds on the same days to organize the projects. For that reason, I mention the Giant and Futuristic bus composition in the schedule.
Heading 1

LIGHTING STUDIO DIAGRAM
As one of the essential factors that, as compositors, we must know is the exposure of light, I attended the training given at the University by the Film and communication tutor. In addition to that training, I completed a specific Lighting for audiovisual project online course to better understand the light's behavior in the compositor's projects (link below).


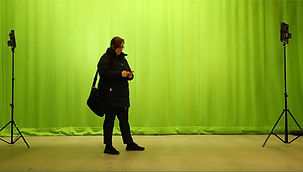
We had some problems matching the first shot with our backgrounds. The studio's lights were in a warm color; then the characters looked dark-orange, so we decided to make a new booking to make a new shot for ourselves. Following the plan of the first studio shot, we prepared our setup with two cameras, one for a close-up shot and the second for the long shot and two lateral lights. We adjusted the intensity of the lights to get a natural color to avoid the same problems with the warm color of the first studio shot.
Lighting and camera plan
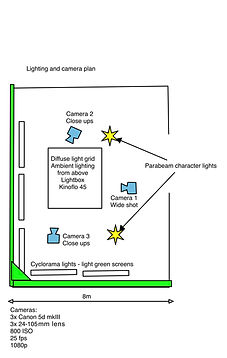
I was adjusting the camera setting for the shots.
Focal length, format 1920x1080p, and ISO.


PROCESS IN POST
1. Disintegration background compositions.
I found the computer room picture online which fit properly with the idea of my project. I fix the size to fit with the composition and to get better realist effects and I finally duplicated the light of the ceiling.


2. Working in the composition.
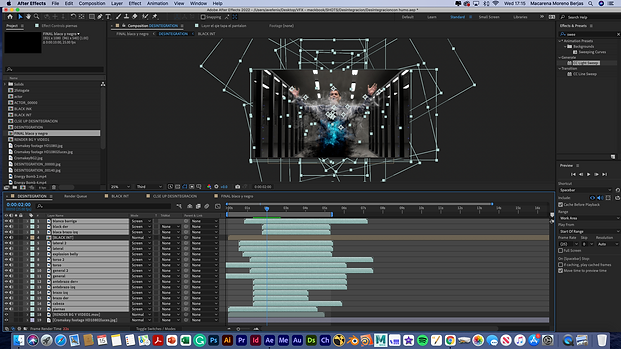
2.1. Editing the shots in After Effects and learning about timeline, layers and continuity.
2.2. Working in Nuke the format of the footage, fps, and key-light
Nuke is the standard software used for VFX compositions. In the below video, I show the change of the size of our footage using the reformat node, the standard 25 fps for the final project, and the use of the key-light node to convert out the footage in the alpha channel using any background. We can check footage using the keyboard numbers (1,2,3...) because Nuke assigns those numbers to connect to the viewer. The key-light node has to be adjusted in the screen gain and matte values, and the merge node makes sure the two footages are seen in the viewer.
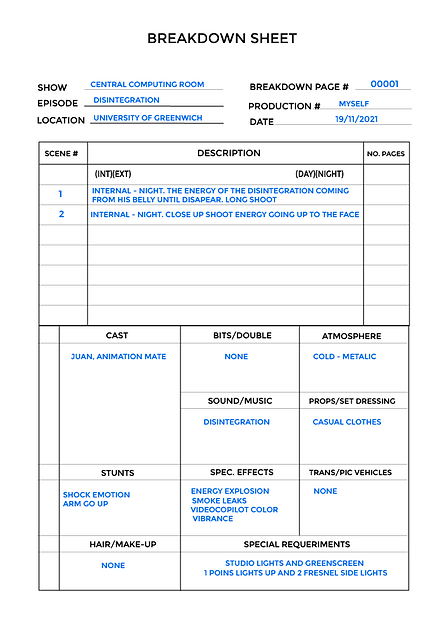
3.Breakdowns


4. Building the energy effect
-
The first thing was to alter the color background slightly and add an effects blur and tweak, scale, and position the image's background.
-
After that, I changed the actor's color to adjust him with the background color and add a CC light sweep plugin to add edge lighting to different areas of our actor as we can see in the right side picture.

-
I downloaded some assets to get a specific style for this project, I used mainly leaks and energy bomb assets.
-
I added the asses in screen mode in the scene and I change the scale, position, and rotation to place over the area of the actor to get different sizes from the legs, belly, and arms to have the energy flowing out from the actor.
-
Then, I lined up the assets in the timeline to begin appearing how I thought looked best.
-
I looked for a base black energy color and bright energy on top; then, I duplicated assets and pre-composed them.
-
I added a unmult After Effects plugin to remove the black background from the assets. After that, I added an invert plugin to make then black and to increase the thickness I added a curve effects too.

-
For the bright energy, I duplicated some assets too and staggered the timing of the rest to create some delay and separation for the look that I was going to change the scale rotation and position of some assets to create more diversity.
-
I used the color vibrance effect plugin and I adjusted the curves to get a great contrast.

-
Finally, I added a mask on the actor layer and animate it to expand as the energy does until I no longer see the actor.

FINAL COMPOSITION
Color
Black and white
EVALUATION
-
In the disintegration composition, the lighting matches the intensity, direction, and quality of the shadows, duplicating the ceiling lights of the background and using the CC light sweep plugging of After Effects to get the reflects in the shoulder of the character. I matched the tonality colors and perspective, adjusting the character in the middle of the composition to create depth of field with the background.
-
I didn't need to use any camera effects because they were made in After Effects.
-
The quality of the key-light was excellent, and the final result shows the edge's excellent transparency and high quality of details, however, it could be even better with a proper adjustment of the camera lens.
-
The comparison with the inspiration picture from the industry matches the character's position, the beginning of the effects, the movements of the characters, the evolution of the effects, and the final disintegration.
Like I mentioned before, I was working on another two more compositions without effects to get more knowledge about compositions. I show them below with a short overall about the work project.
1. Futiristic bus composition. This composition uses different footage and pictures that I took from my previous office in Canary Warf. One day I thought if we could use an out elevator or lift, all of my visitors could have those amazing views of London. So I took some pictures, and I designed a composition playing with the backgrounds to match the green screen that I shot in the studio.
It was very complicated work with the key-light in this composition because our team's shots before the lighting training were wrong. We didn't separate the lighting set to the right and left side; The focal lens and ISO were not adjusted either. To get transparency, I used the key-light and many masks. The floor was not a green screen then I had to do some rotoscopy. The more of the mask matte used in key-light, the more transparency in character, then at the beginning, the composition lost many edge details. I fit as much as possible, and it looks finally good; however, I can still appreciate some mistakes in the mask matte.
I added much blur on the character in the middle of the composition to transmit a molecular transporting body and, in the end, some sound effects as the typical music lift.
Backgrounds and greenscreen


Final Composition
2. Giant composition: I wanted to create a miniature composition, playing with differents footage scales. The studio shot got the giant footage and I took pictures of the house and fence around my house. The background and foreground of the giant composition matched well with the long shot, however, I had to adjust hue and saturation to match with the close-up shot.
Matching backgrounds and shots


Rotoscopy - Matching colors in After Effects
Final Composition
OVERALL
A good plan of the scenes and lighting shots are needed to get an excellent final composition. Otherwise, the key light's transparency could be complicated or even ruin the scene.
I like to work with some mates like Juan, Sophia, and Matthew. They were not in my group, but we agreed to share ideas and time in the studio to learn about lighting and get our shots to create the compositions.
I knew After Effects, but Nuke is a fantastic software for compositing, and I hope to learn more in the second term.
REFERENCES
- Behind the scene - Watchmen - Dr. Manhatan
-Carolina Jimenez Garcia - Croma Key. History and uses (Spanish)
-Key-light in After Effects
-Nuke for beginners. Pablo Mereo online course
https://www.pablomereu.com/courses
bottom of page